


Where Should You Serve To According to the Passer’s Team’s Rotation?

tl:dr
Serving to zone 6 is usually the best option, regardless of the rotation the setter is in. This is likely due to having a lower service error rate.
Serving to zone 9 looks fruitful when the setter is front row. This could be to take out the front-row middle blocker so the only good option is to set to the front-row outside hitter.
Serving to zone 8 is good when the setter is in zone 1 and zone 4. This could work to disrupt the approach of the middle blocker, so they have to wait or actually pass the ball, or the passer will need to pass low.
Serving to zone 5 when the setter is in zone 6 and 2 also looks to work.
Introduction
The serve is the only action in volleyball where success and failure are determined solely by the server. There is the technical execution of the serve and there is also the strategic aspect of the serve. I have looked into where you should serve the ball to (see link) and where you should serve the ball from (see link). I also put those two factors together to find where you should direct your serve (see link). I essentially found that serving to the middle (zone 6 and 8) and serving from zone 1 generally results in the highest or near highest rally win %. It works better if you put them both together.
Another strategic factor is the rotation of the passing team. For example, it’s a fairly common strategy to serve toward zone 1 to interrupt the movement of the setter coming from zone 1. Another example is to serve toward zone 5 when the setter is front row to take out the front-row outside hitter. So do these strategies actually work? Is there something in the data to suggest another strategy? I wanted to find out.
Method
The serve destination or passing origin zones are split into nine zones from 1 to 6, covering the normal positions, and zones 7 to 9, covering the midcourt zones (see diagram below). I have also labeled the three horizontal lines as short (zone 2-4), mid-court (zone 7-9) and deep (zone 5, 6, 1). The three vertical lines are labeled left-side (zone 4, 7, 4), middle (zone 3, 8, 6) and right-side (zone 2, 9, 1).

There are 6 rotations that the setter will be in. I will refer to the zone the setter is in rather than the USA-style rotation number. There could be confusion if I say rotation 2 because we’re not sure if it is setter in zone 2 (European-style) or the setter in zone 6 (USA-style).
All teams in the Super League used the 5-1 system. This will give you an idea of where the setter is coming from and how the reception unit is set up.
The performance indicator I use to measure serving performance is the Rally Win %. It is the percentage of service attempts in which the rally was won. It is calculated as:
Rally Win % = Rallies Won/ Total Service Attempts
Data is collected via DataVolley. I will use data from 10 competitions. However, I will combine them into two general levels – Super League level and London League Level. The main reason for this is although each competition level has a minimum of one thousand service attempts, I have to split up those attempts into six rotations and then split it up further into nine serve destination zones. This means many of the short and mid-court zones will have less than 10 service attempts, which is subject to the volatility of the data.
Women’s Super League LevelWomen’s Super League | 2017-22 | Team SideOut London | 13,500 Total Service Attempts
There are enough service attempts that I don’t need to mix with other competitions.
Women’s London League LevelWomen’s London Premier | 2022-23 | Flaming Six Coyotes | 1,098 Total Service AttemptsWomen’s London Division 1 | 2021-22 | Flaming Six Coyotes | 1,201 Total Service AttemptsAll Nations Tournament (Women) | 2022 | Team USA | 1,733 Total Service AttemptsBUCS Tier 1 Women | 2018-19 | City University London | 243 Total Service Attempts
There are some Super League level players and London Division 2 level players in these competitions but the majority of the players playing in these competitions compete at London Premier and London Division 1 level.
Men’s Super League LevelInternational Competition (Men) | 2020, 2022-23 | England National Team | 1,830 Total Service AttemptsMen’s Super League | 2019-20 | IBB Polonia London | 2,895 Total Service Attempts
Most of the players in the England National Team play in the Super League and their most-played opponent is Scotland, who can easily compete in the Men’s Super League.
Men’s London League LevelBUCS Premier Men | 2021-23 | UCL Men | 1,903 Total Service AttemptsBUCS Tier 1 Men | 2021-22 | UCL Men | 1,765 Total Service AttemptsMen’s London Division 1 | 2022-23 | Flaming Six Leopards | 1,002 Total Service Attempts
BUCS Tier 1 Men and Men’s London Division 1 are at a very similar level. BUCS Premier Men is a higher level but it is close enough.
The performance indicator I use to measure serving performance is the Rally Win %. It is the percentage of service attempts in which the rally was won. It is calculated as:
Rally Win % = Rallies Won/ Total Service Attempts
Results
The following tables will show the rally win % by serve destination/ passing origin and rotation. I used conditional formatting to highlight the rally win % levels, with green being the highest rally win rate and red being the lowest rally win rate. The data is not presented in the best way as this is coming off a pivot table. However, you can imagine the nine coloured cells are organised like a volleyball court with serves coming from the top. I also included the total service attempts (TA).
Setter in Zone 1
The data suggests serving to zone 8 is the best strategy as it has the highest rally win % in all competitions except for the Men’s Super League level. It could be a combination of the central passer having to pass low plus it might be short enough for the front-row, transitioning middle blocker to pass the ball. Another advantage of serving to zone 8 is if it goes deeper to zone 6 then that’s not bad either since it has a generally high rally win %. It looks like there isn’t much support for the strategy to serve towards zone 1 and/or 9 to disrupt the movement of the incoming setter. The rally win % is high on the right side in the women’s game but there are better zones to serve to.

Setter in Zone 6
The data suggest that serving to zone 5 and 6 is the best strategy as it results in a high rally win %. It could be fruitful to serve toward zone 9 as it has the highest rally win % at the London League level. It could disrupt the transitioning, front-row middle blocker. However, there are few attempts at this level.

Setter in Zone 5
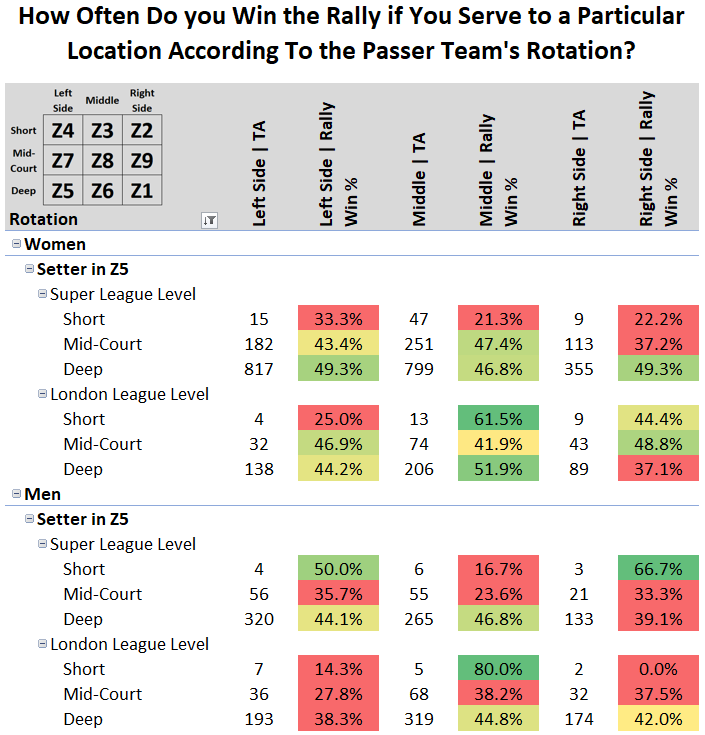
With the setter coming from the right side (although the setter can be closer to zone 3), you would have thought there are several zones that can be taken advantage of. There is zone 1 and 9 so the setter has to take the passed ball coming behind them, especially tricky if the setter is lazy and doesn’t fully transition to zone 2.5. There is zone 7 to disrupt the transitioning, front-row middle blocker and zone 8 which can disrupt both the middle and setter. It looks like there isn’t much support for any of this. There’s a high rally win % if serving to zone 5 (Men’s Super League level) or zone 1 (Men’s London League level) or both (Women’s Super League) but not in the other competitions. There’s also a high rally win % if serving mid-court to the sides (Women’s London League level) but not in the other three competitions.
It is boring but it looks like serving to zone 6 has the highest rally win % in all competitions except for the Women’s Super League. Even in the Women’s Super League, it isn’t exactly a low rally win %.
Setter in Zone 4
The data suggest that serving to the middle (zone 6 and 8) and the right side (zone 1 and 9) can be fruitful in winning the rally. Serving to the middle will make sense since it has a low service error rate. Serving to the right side makes sense too since the setter is pinned to zone 4 so they have to set the passed ball coming from behind them.

Setter in Zone 3
The data suggest that serving toward zone 9 is the best strategy as it has the highest rally win % in all competitions except for the Women’s London League level. A reason for this is it would disrupt the middle blocker’s approach. They would either have to wait until the ball is passed or they have to pass it themselves. This means they would be late for a quick middle attacker so it is not used as an option. This could explain why the rally win % isn’t high at the Women’s London League level because the sets to the middle blocker tend to be a medium or high ball at this level. Serving to zone 6 and perhaps zone 8 are also safe bets.

Setter in Zone 2
It does look like serving toward zone 9 is again a good strategy as it has the highest or second-highest rally win % in all competitions.

Discussion
In general, it does look like serving toward zone 6 is the best strategy in any rotation the setter is in. This is probably due to the fact that it has a low service error rate, i.e. you can’t serve too far out left or too far out right. Regarding specific rotations, it looks fruitful to serve toward zone 9 when the setter is in the front row. This may have to do with the fact that it takes out the middle attacker because passing is worst when passing low and from the sideline (see link). Even if the pass is perfect, it needs to be high enough so there’s time for the middle blocker to run the quick attack, which can be tricky when the passing origin zone is close to the target zone. With the opposite in the back-row and with back-row options generally not being effective (see link), the only good option is the front-row outside hitter, which can be anticipated and make it easier to defend against.
Serving to zone 8 is good when the setter is in zone 1 and zone 4. This could work to disrupt the approach of the middle blocker, so they have to wait or actually pass the ball, or the passer will need to pass low.
Serving to zone 5 is also good when the setter is in zone 6 and 2. It simply be to take out the front-row outside hitter but this reason doesn’t explain why it works in all rotations.
Conclusion
Serving to zone 6 is usually the best option, regardless of the rotation the setter is in. This is likely due to having a lower service error rate.
Serving to zone 9 looks fruitful when the setter is front row. This could be to take out the front-row middle blocker so the only good option is to set to the front-row outside hitter.
Serving to zone 8 is good when the setter is in zone 1 and zone 4. This could work to disrupt the approach of the middle blocker, so they have to wait or actually pass the ball, or the passer will need to pass low.
Serving to zone 5 when the setter is in zone 6 and 2 also looks to work.

Comments