


Push and Pull Metadata to Change Sets from VS Code

You might ask why would we need something like this in, especially, in today’s time.
Well, no matter the advancements and new amazing tools for DevOps in Salesforce, we cannot forget the fact that a large number of Salesforce customers still use Change Sets as their primary tool for deployments. And if you’re a developer (or consultant) working for such customers than you can have a hard time adding/removing metadata to the Change set for larger deployments. So, how do we solve this problem?
Concept
If you’ve been in the ecosystem for long enough, you might realize that this has existed since the old days of Ant Migration tool.
Change Sets are essentially treated as packages. Once you create a change set, you can consider it as a package and add metadata via Salesforce’s CLI (sounds a little abstract but that’s all there’s to it). There is a very small catch which I’ll get to at the end of this post.
The whole process requires you to run a few sfdx commands in your VS code terminal; not very convenient if you’re not into CLI like me😄. To make it a little easier, I created a VS Code extension which allows you to do it with just one command; more on this at the end.
Now let’s do a small walkthrough.
How to?!
For this demo, we’ll use VS code because that’s what most of the Salesforce Developers are using these days.
Pre-requisite(s): Set up your VS code, installed SF CLI, create a new project in VS code and authorize a sandbox with the current project.
Step 1: To start with, we need to first create a Change Set. This is a manual step and you can’t achieve this via your VS code (at least as far as my knowledge is concerned). So, in your org, Go to Setup -> Outbound Change Sets -> New. Enter a Name and Description. Hit Save.
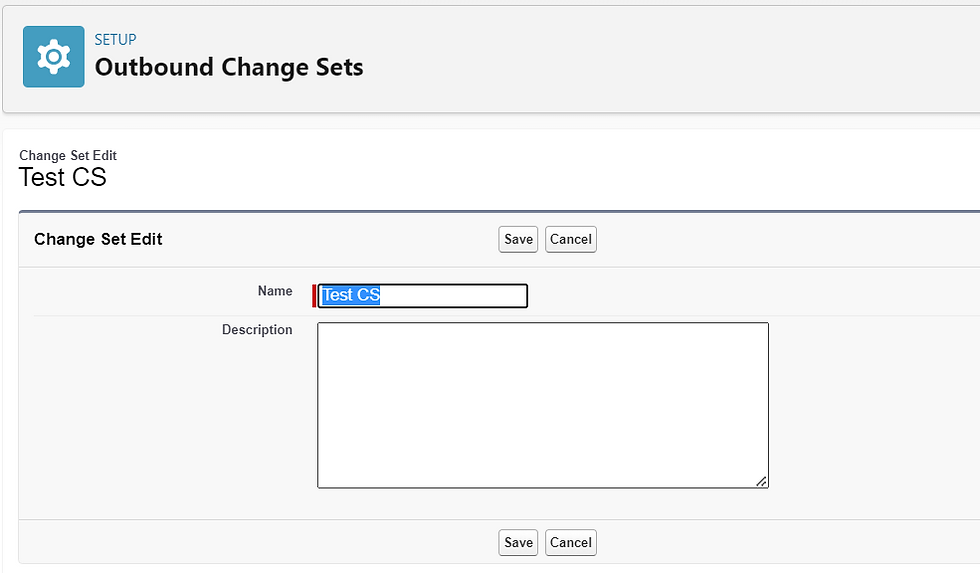
NOTE
: This is an important step. If you forget to create a change set and push the metadata, you will accidentally create a package in your org.
Step 2: Create a folder with same name as your Change Set in your root directory of your VS Code, in my case ‘Test CS‘. We’ll use this folder to manage the metadata of your Change Set (gives it a bit more structure). Within in the change set folder, add another folder called main, and add another folder called default inside the main folder.
Resulting Folder hierarchy
- Change Set Folder - Main - Default

Note
: Though it doesn't matter if you create main and default folder when pushing Metadata to the change set, however, if you want to pull the metadata from a change set and if you don't specify a target directory, the retrieve command auto-creates the
<ChangeSetFolder>\main\default
directory. Hence, we added the main and default folders to follow the standard structure.
Step 3: Run the source convert command in your VS code terminal to convert your project metadata from source to MD API format. We have to do this because we’re going to use MD api deploy command to deploy the metadata, so we need to convert the metadata into MD API format.
SFDX Command to Run:
sfdx force:source:convert

Once you run the force:source:convert command (without additional attributes), it will convert all the metadata present in the “force-app” directory(/folder) unless you explicitly specify the path to source directory path. The converted (MD api formatterd) metadata can be found in an automatically created folder whose name starts with metadataPackage_….
Step 5: Move all the metadata from the “metadataPackage_…” folder to the <ChangeSetFolder>\main\default directory.

Step 4: Update the package.xml file in the your <ChangeSetFolder>\main\default directory by adding the name of your Change Set in the <fullName> tag.

Step 5: Finally, run the MD API deploy command to deploy and (hopefully) viola!
SFDX Command to Run:
sfdx force:mdapi:deploy --deploydir "Test CS\main\default" --wait 20
–deploydir specifies the source directory from where the metadata is pushed. –wait specifies the amount of time terminal should show the progress of deployment. I’d recommend to use a higher number so that you don’t have to check the deployment status (which you can check from org or via force:mdapi:deploy:report CLI command) again and again. “Test CS” is the name of my Change Set folder.


The Catch
Coming back to the catch, you cannot remove the metadata from the change set via the CLI. I tried few different ways, but no luck. Bummer, I know… So, to remove metadata from the Change Set, you’ll have to do it manually from the UI.
Don’t want to remember sfdx commands?
Good news, I created a VS code extension that allows you to do all of the above with just one command. The extension contains some other packaging and utility commands as well. 🙂 Possibly, (later) I’ll add a link to video to demo this.
That’s it for this one. Hope you find this one useful. Catch you in the next one! ✌ And thank you for being an awesome reader! Subscribe to this blog for receiving all the latest updates straight to your inbox. 🙂

Comments